ADC-V510 Indoor Camera Guide
Summary: We’ll walk you through setting up your ADC-V510 camera, from powering it on and connecting to your network, to adding it in the Brinks Home™ app and resolving common issues.
Table of Contents
- Common Terms
- Specifications
- Factory Default
- Wi-Fi Setup
- Signal Strength
- Ethernet Setup
- Add via Desktop App
- Add via Brinks Home™ App
- Optional Accessories
- Troubleshooting
- LED Reference Guide
- Further Assistance
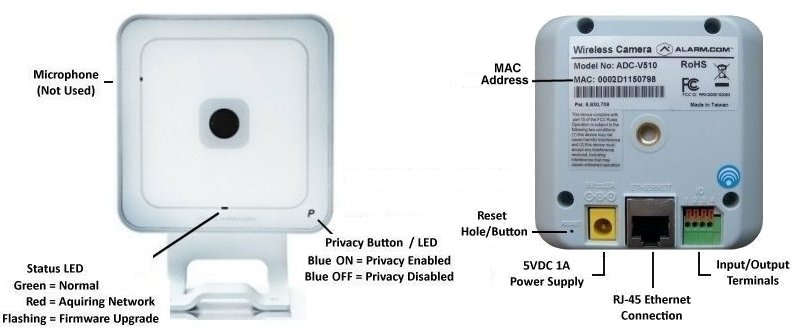
Common Terms
- Transformer (Power Brick)
- The transformer converts household AC power into the DC voltage the camera needs.
- Wi-Fi Extender
- A device that boosts your wireless signal range so the camera stays connected, even far from your router.
- AP Mode
- Access Point mode lets the camera create its own Wi-Fi network for initial setup.
- WPS
- Wi-Fi Protected Setup joins your camera to the network by pressing the WPS button on your router.
- VMD
- Video Motion Detection triggers recordings when movement is detected in the camera’s view.
- Perimeter Guard
- A feature that sets a virtual boundary and alerts you when someone crosses it.
Specifications
- 640 × 480 pixel video resolution
- 49.6° horizontal, 38.2° vertical field of view
- No night vision capability
- Wi-Fi 802.11 b/g
- Ethernet port
- Operating temperature: 32 °F to 104 °F
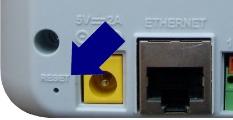
Factory Default
Warning: Resetting erases settings. You must contact us after reset: 469-513-8685.
Hold the reset button for 10 seconds until the LED blinks red.
Wi-Fi Setup
WPS Mode
- Press and hold the reset button for 5 seconds until the LED flashes blue.
- Within 2 minutes, press the WPS button on your router.
- If the LED turns solid green, the camera joined your network. If it flashes red, try again.
AP Mode
- Press and hold the reset button for 6 seconds until the LED flashes white.
- On your phone or computer, join the camera’s SSID “Alarm XX:XX:XX”.
- Open a browser to
http://192.168.1.1. - Select your home network, enter the password, and confirm.
- Wait for the LED to turn solid green.
Signal Strength
- Open the Brinks Home™ App.
- Tap Video (camera icon).
- Tap ⚙️ (gear icon) in the top right.
- Select your ADC-V510 camera.
- View Signal Strength.
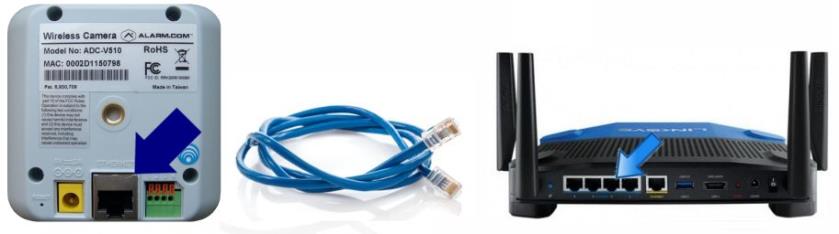
Ethernet Setup
Connect the LAN port on the camera to your router using an Ethernet cable.
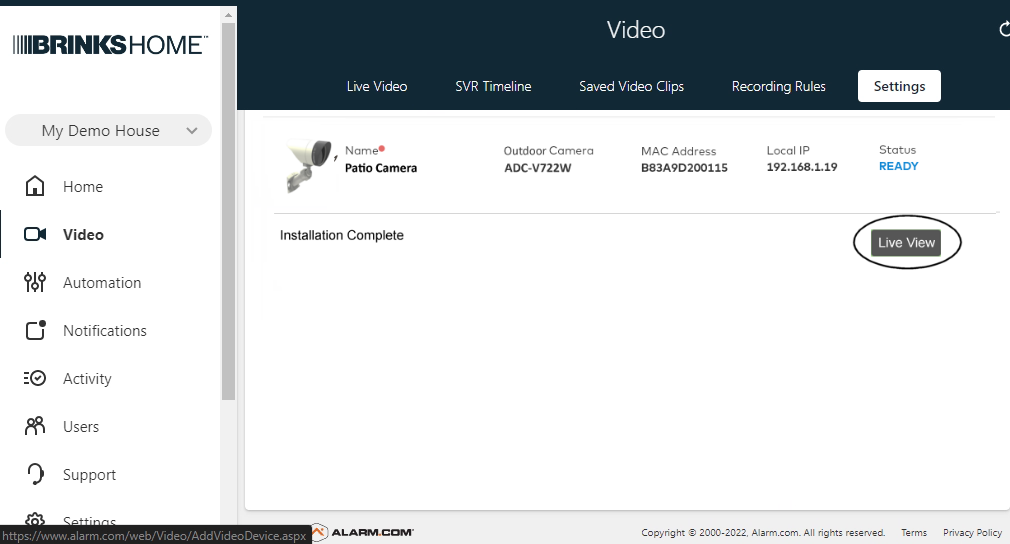
Add via Desktop App
- Log in to the Brinks Home™ Desktop Portal.
- Click Video.
- Click Settings.
- Click Add Video Device.
- When the ADC-V510 appears, enter a name and click Install.
- Click Live View to see your camera feed.
Add via Brinks Home™ App
- Open the Brinks Home™ Mobile App.
- Tap Video at the bottom.
- Tap ⚙️ (gear icon) in the top right.
- Tap Add Video Device and choose ADC-V510.
- Enter a name and tap Next.
- Wait for the camera to configure.
- Tap Live to view your camera.

Optional Accessories
- Wi-Fi Extender
- SD Card Module
- Ethernet Cable (for extended runs)
- Transformer (Power Brick)
Troubleshooting
No Power
- Ensure the power adapter is firmly plugged in.
- Try a different outlet or power strip.
- Inspect the transformer cable for damage.
- If the LED never lights, contact support at 469-513-8685.
No Network Connection
- If using Ethernet, check the cable connection.
- If using Wi-Fi, repeat the Wi-Fi Setup.
- Move the camera closer to your router or extender.
- Check Signal Strength in the Brinks Home™ App.
No Live View
- Power cycle the camera by unplugging and replugging the adapter.
- Verify your app is up to date.
- Ensure you’re logged into the correct Brinks Home™ account.
- If you still can’t see live video, reset the camera and re-add it.
LED Status Reference
Further Assistance
Need more help? Contact us.